


Iris photography setup – A guide to capturing high quality iris portraits – Watch on YouTube
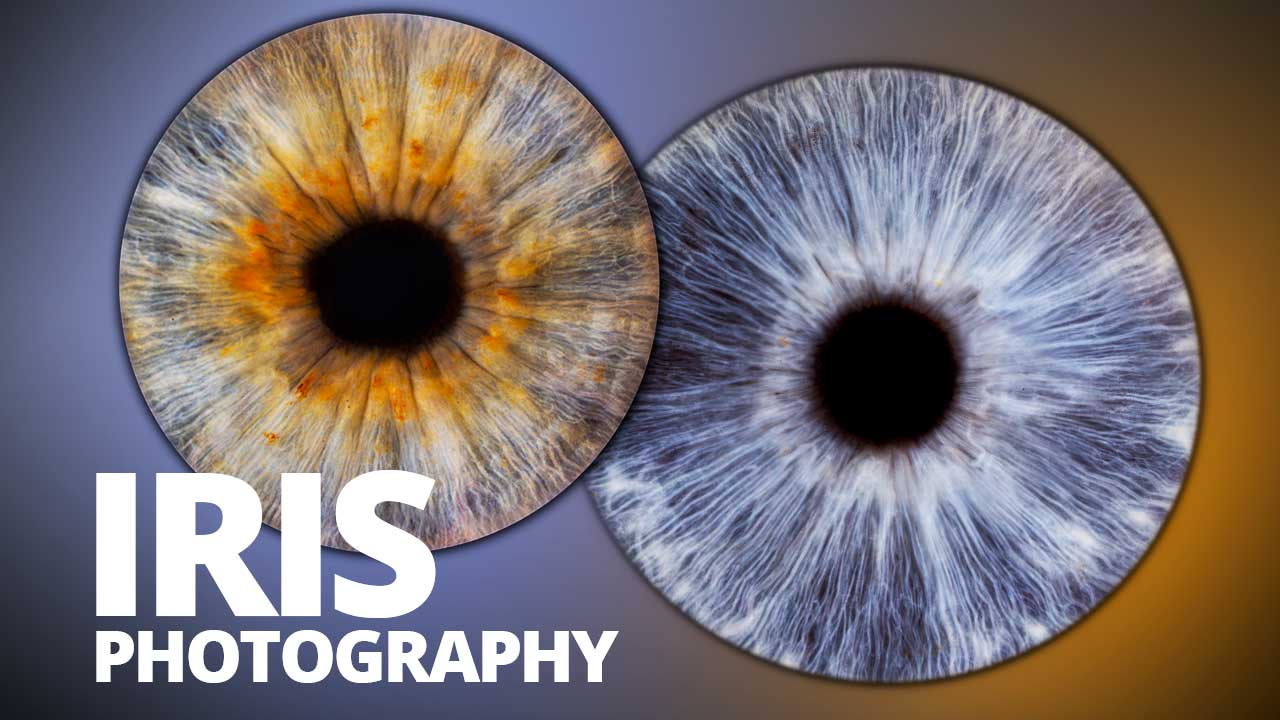
The iris is a highly detailed subject that moves constantly, reflects everything around it, and reacts to light instantly. To capture it properly, every part of the setup needs to work together.
This guide builds on our original iris photography tutorial and updates the method with refined lighting and workflow improvements. The goal remains the same. To produce a clean, detailed iris image that is a true representation of the subject, suitable for large prints and repeatable in a studio environment.

What defines a good iris photography setup
Iris photography is often mistaken for a simple macro exercise. In reality, it is closer to a controlled portrait setup at extreme magnification. The challenges are unique. The pupil must remain small and stable. Reflections must be managed without removing real detail. Focus needs to be precise, and movement must be eliminated as much as possible.
A good iris photography setup solves these problems at capture stage rather than relying on heavy post processing. This is what allows the workflow to remain fast, accurate, and scalable.

Equipment for iris photography
Sony A7 III camera body
A Sony A7 III was used for our setup. Any modern DSLR or mirrorless camera will do the job but as with most photography, a better camera will make everything easier. Aside from interchangable lenses and manual exposure settings, the most important feature of you camera will be the resolution. More megapixels means you can capture more detail and can print larger!
Sony 100mm f2.8 GM Macro lens
The Sony 100mm f2.8 GM Macro lens provides true macro magnification with excellent sharpness and contrast across the frame. A dedicated macro lens is essential for iris photography, as it allows the iris to fill the frame without excessive cropping while maintaining image quality suitable for printing.
Sony 2x teleconverter
The Sony 2x teleconverter is used to increase magnification while preserving a comfortable working distance between the lens and the eye. This extra reach helps minimise cropping later and allows more precise lighting placement without crowding the subject, which improves both comfort and consistency. If your camera has extreme resolution (50MP+) you may not need this.
Head rest
A professional head rest is used to stabilise the subject and eliminate front to back and side to side movement. At macro scale, even very small movements can affect focus and alignment, and a head rest ensures that multiple exposures of the same iris line up accurately during capture.
Head surround
A head surround or shroud is placed around the subject’s head to block ambient light and reduce unwanted reflections in the eye. It also helps subjects feel visually isolated from the room, which encourages relaxation, reduces blinking, and makes the capture process smoother and faster. It doesn’t matter what this looks like, as long as it blocks the light.
Manfrotto ONE tripod
The Manfrotto ONE tripod is used to keep the camera fixed and precisely positioned in front of the subject. While handheld shooting is possible with flash, a stable tripod removes another variable from the process and helps ensure that both exposures of the iris match perfectly.
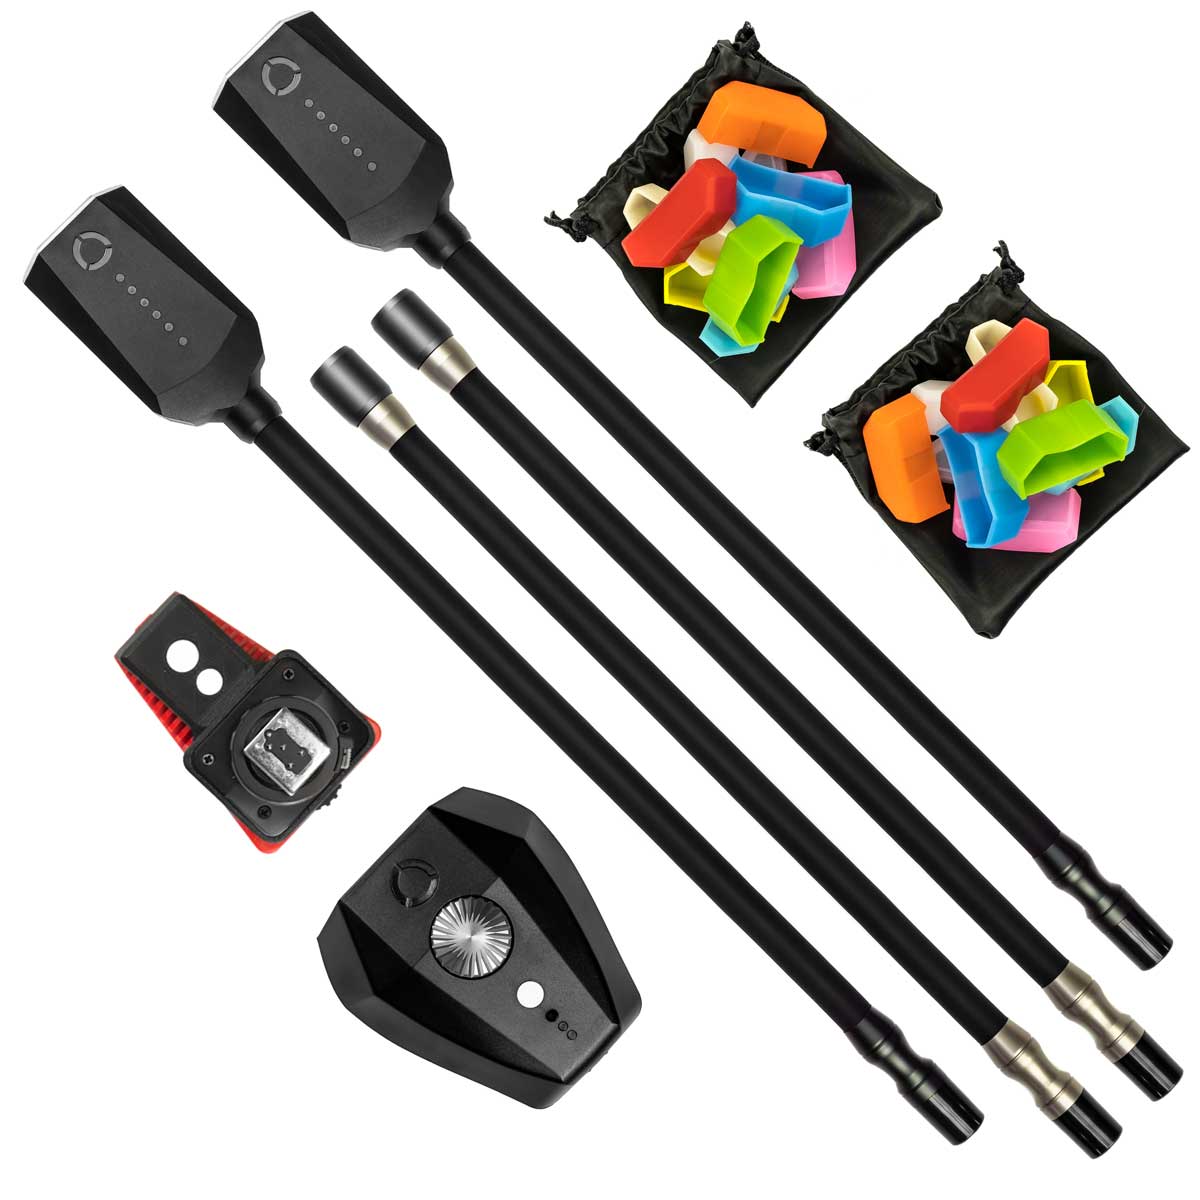
Adaptalux Iris Photography Pack
The Adaptalux Iris Photography Pack provides the small, flexible lighting needed for iris photography, supporting both continuous LED and xenon flash. The LED lights are used to gently contract and stabilise the pupil, while the flash freezes motion for the final exposure, producing clean, high quality images with controlled reflections and accurate colour.

lighting is the most important part of iris photography
ighting is what defines iris photography. The curved surface of the eye will always reflect light sources. These reflections, known as catchlights, are the biggest obstacle to clean iris images.
To manage this, a flexible lighting system is required. The lights must be small, precisely positioned, and fully controllable. High colour rendering is essential to accurately reproduce iris colour and texture.
This updated workflow uses a combination of continuous LED lighting and xenon flash. Each serves a specific purpose and together they solve multiple problems at once.
The Adaptalux Studio is the ideal lighting for Iris photography. It’s a lighting system designed specifically for macro photography and perfect for getting light into the right position to photograph the eye. The small, flexible lighting arms are easy to position close to the eye and are powerful enough to get great settings.
There are LED and Xenon Flash options. Which you choose will depend on your needs, budget and preferences. For a breakdown of the results of the LED only setup, please see our previous article.
In this article, we’re using the full Xenon Flash setup to aim for the highest quality images possible.


Using LED lighting to control the pupil
Continuous LED lighting is used first to contract the pupil. Unlike relying on flash alone, LED lighting allows the pupil size to stabilise before the photograph is taken.
The LED lights do not need to be bright. In fact, lower brightness improves comfort and reduces watery eyes. Once the pupil has contracted and stopped changing size, the camera can be focused and aligned precisely. If you photograph with flash alone, the pupil will be large, hiding most of the detail within the iris.
This predictable pupil control is one of the key improvements over older methods that relied solely on bright continuous lighting for exposure.

Capture the exposure with xenon flash
Once the pupil is stable, xenon flash is used for the actual exposure. Flash provides a large amount of light in a very short time. This freezes eye movement and allows for lower ISO and smaller apertures, improving sharpness and depth of field.
Because the flash fires faster than the eye can react, there is no blinking response. This makes the process more comfortable, especially for people with light sensitive eyes.
Each iris is photographed twice. One image is lit from the left and one from the right. The camera and subject do not move between shots. The only difference between the images is the position of the reflection.

A simple and repeatable capture workflow
The capture process is straightforward. The iris is framed to fill the frame without clipping the edges. Focus is set on the iris texture rather than the pupil or eyelashes.
LED lighting is activated first to contract the pupil. After a short pause for the eye to stabilise, the flash on one side is enabled and the image is captured. The lights are then switched to the opposite side using the Adaptalux App and the second image is taken with the same process.
Because everything remains aligned, the two files match perfectly. This consistency is what makes the post production process fast and reliable. The bigger the difference between the two images in terms of framing, exposure, focus and iris size… the harder it will be to allign and process them later.

Post processing without Ai
Both raw files receive the same global adjustments. Contrast, texture, clarity, and noise reduction are applied equally to both images.
The two images are then layered and aligned in a single photoshop file. Since the reflections appear on opposite sides, masking one layer removes the reflection using real data from the other image. There is no cloning and no guesswork.
This approach preserves the authenticity of the iris. AI generative tools can remove reflections, but they replace real detail with estimates made by the computer. For commercial iris photography, accuracy matters and your customers will expect an image of their own eye, not an Ai guess.

LED only setups are still valid
Not every photographer needs to start with flash. LED only setups remain a viable and cost effective way to explore iris photography. They are simpler and make framing and focus much easier before pressing the shutter.
However, for those planning to offer iris photography as a service, introducing flash improves comfort, image quality, and efficiency. It reduces eye strain, speeds up sessions, and produces files that hold up better at large print sizes.

Starting iris photography with confidence
Iris photography works best when treated as a system rather than a one off. Stability, lighting control, and a repeatable workflow matter more than brand names or complex editing.
By controlling pupil size, freezing motion, and removing reflections using real image data, it becomes possible to produce accurate, detailed iris portraits quickly and consistently. This is what allows iris photography to scale from a personal experiment into a professional offering.
If you need lighting to take your own iris photographs, we have put together two Iris photography lighting packs that have everything you need to get started. While these packs are configured for great Iris results, they are also highly capable for other kinds of macro photography, read some of our other articles to see what else you can do with great lighting!
Don’t forget to subscribe to our YouTube channel for more macro photography tutorials, ideas and inspiration!

- CPU Macro Photography – Create Abstract Cityscapes with Light and Detail - 12th July 2026
- Photographing Grains of Sand at High Magnification - 28th June 2026
- Colourful Abstract Macro with a CD – A Fun Shoot to Try at Home - 14th June 2026


