


A lot of the time, getting closer can reveal the amazing details of a subject. This is always more apparent when light interacts with a subject in unique ways. Today we are looking at 3 crystal formations that geologists will be familiar with. However, the process of getting representative (and creative) photographs of these beautiful minerals may not be so familiar. Let’s get started with our mineral photography tips by taking a look at the first subject.
Mineral Photography Tips

Striped Agate photography
To kick off our mineral photography exploration let us take a look at a thin slice of blue striped Agate. This subject was particularly beautiful, even without additional lighting. As this specimen had been in storage for a while, the first thing to do is clean it. We used a lens cloth, as the surface is just like glass and it removed the excess dust and fingerprints. We then placed it in a crocodile clip, on a clamp (with some cloth to prevent scratches).
Next is to experiment with your macro lighting. We brought in a single white Adaptalux Studio Lighting Arm from above. This allowed us to move our light source very easily and precisely to see how the light falls inside the crystal.
Because it’s translucent, you can create shadows within the crystal, like under the crack and the rim of rock around the edge.

Being aware of your lighting can help define features and imperfections. With the careful placement of lights, fissures and discolouration can be made more apparent. In this case, two lights were placed behind the subject to create a strong shadow and highlight the blue colour simultaneously.
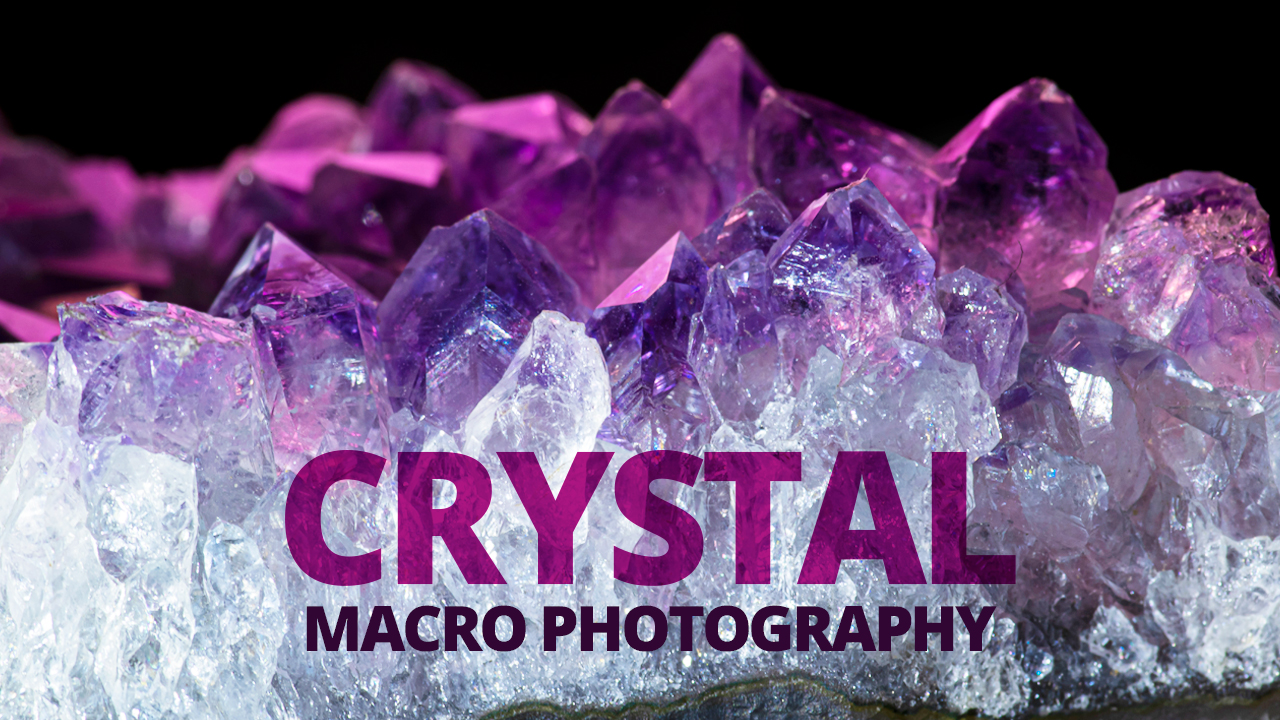
Amethyst photography
The next subject is Amatyst. It’s a common crystal that is easy to get hold of. If you are a macro photographer wanting to try out some of these mineral photography tips for yourself, you should be able to find a great sample online for not much money.
Our sample was again, very dusty. This time we used a soft makeup brush to clean the dust out from inside the gaps created by the crystals.

Shooting this piece of crystal from the side shows an amazing transition from the rocky outer surface, through the white crystal and finally into the signature purple colour. For the shot above, we added a pink colour filter. Although this might not be for everyone, the enhancement of the colours already in the crystal leads to a more striking image.
For the Geologists out there, it’s possible to get the same effect using white light. If you want a “representative” shot of the colour in your sample, use a diffuser to preserve the natural colour.


Aragonite Photography
Our final subject for this post is an interesting sample of Aragonite. This sample came from Morocco and has been in storage for a long time, but you can still see some of the orange earth attached to the crystal.

Because of the spherical nature of this subject, it’s very hard to focus. When shooting a flat surface like the Agate slice and Amethyst, it’s easy to align the subject parallel with the front of the lens (therefore getting the whole subject in focus). However, this subject has crystals pointing in all directions.
We found it best to focus on specific interesting features, rather than trying to get everything crystal clear. (Pun intended).

Careful placement of your lighting can improve clarity and drama in the shot. Due to the solid and opaque centre of this crystal, several lights were placed around the sides of the subject.
Tweaking your lighting to your liking is made very easy by a continuous light source. Trying to use flash with this precision would be difficult, as you can’t see the light interacting with the crystal as you go!

Our final shot makes use of more colour filters for a more creative and abstract image. Have a go at highlighting interesting features using colour as well as light. The blue here draws the eye to the crack in the crystal, don’t you think?
We have had lots of fun shooting crystals and putting together these mineral photography tips for you. If you have any crystals of your own, make sure to let us see your results, we love seeing your work.
Don’t forget to subscribe to our YouTube channel for regular macro photography tutorials, ideas and inspiration!

- Macro Photography with Hot Glue: Alien Egg Abstracts at Home - 29th March 2026
- Adaptalux at The Photography Show 2026 – Our Biggest and Brightest Year Yet - 23rd March 2026
- Needle Macro Photography – How to Capture the Eye of a Needle (10x magnification) - 15th March 2026


What was the brand /model of the dual goose neck lights in the YouTube video
Hi Mike, We make them! It’s the Adaptalux Studio and you can get it right here on our website via the store link at the top of this page.
Camera and lens set up?
Hi Jose, these were shot on a Nikon D5600 and a Tokina 100mm f2.8 Macro.
Found so much value from your post! Thank you!!
Glad you found it useful Kasey!
What are your manual camera settings?
Agate – F18 1/640 and ISO500
Amethyst – f20 1/60 and ISO100