


Beer Glass Macro Photography Tutorial – Turn your drinks into abstract art! – Watch on YouTube
Most of us enjoy a cold beer now and then, especially on a warm day. But today, instead of drinking it, we’re turning that beer into abstract photographic art. In this Beer Glass Macro Photography Tutorial, we’ll show you how to capture stunning, abstract images of your beer glass at home!


Shooting Beer as a Macro Photography Subject
Beer might not be your first thought when it comes to macro photography, but it makes a surprisingly beautiful subject. The colour, bubbles, glass textures, and condensation all add to the visual interest. With the right lighting and setup, even an ordinary bottle of beer can look like a work of art.
What You’ll Need
Here’s a simple setup:
- A macro lens (like a 100mm f/2.8)
- A tripod and, ideally, a macro focusing rail
- A few glasses of cold beer
- A spray bottle filled with water
- Adaptalux Studio Lighting – we used an amber Lighting Arm and a white Lighting Arm with a colour filter
No fancy props required—just your favourite beer and a little creativity.


Setting Up Your Shot
Start by pouring your beer into a glass. We used two San Miguel bottles and two different glasses to play with shape and texture. Different glasses reflect light in different ways, so experiment with a few if you can.
Place your camera on a tripod. This frees up your hands to tweak lighting and positioning without needing to refocus constantly. Even if you’re not doing focus stacking, it makes your workflow smoother.
Be aware that beer loses its head quickly, so time is a factor. If you’re after bubbles or froth, shoot fast.


Lighting for Beer Photography
Once your shot is framed, it’s time to bring it to life with lighting. Turn off any strong ambient light sources like video lights or windows—those will create large, unwanted reflections on the glass.
Instead, use backlighting. This is where the The Adaptalux Studio really shines. With just one Amber Lighting Arm, you can give your beer a rich, warm glow that brings out its colour and texture.
Move your Lighting Arm around and observe how it changes the shot. Shifting your amber light to one side might highlight condensation droplets. Move it again, and you might get deeper color in the beer. Experimenting with placement is key—just a small shift can totally change the mood of the photo.
If you’re using a glass with printed branding or artwork, experiment with positioning the logo between your light source and camera. It adds depth and helps tell the story behind the beer.

Creating Condensation
Cold beer on a hot day means condensation – but if your environment isn’t warm enough, it might not appear naturally.
Here’s the trick: use a spray bottle filled with clean water. A light mist on the outside of the glass mimics condensation beautifully. It’s a classic trick used in commercial shoots.
These droplets catch the coloured backlight from the lighting setup, adding texture and interest to your image.

Macro photography naturally creates shallow depth of field. Use this to your advantage. Focus close on water droplets, bubbles, or the edge of the glass, and let the rest fall off into blur. This is where your image starts to feel more abstract and artistic.
A good abstract image often leaves the viewer with questions – what am I looking at? How was this captured?
Want more bubbles? Simply give the beer a gentle stir with a clean utensil. This agitation creates fresh movement and livens up the glass again, just like it was freshly poured. It’s especially effective if you’re capturing video or shooting a series of frames.

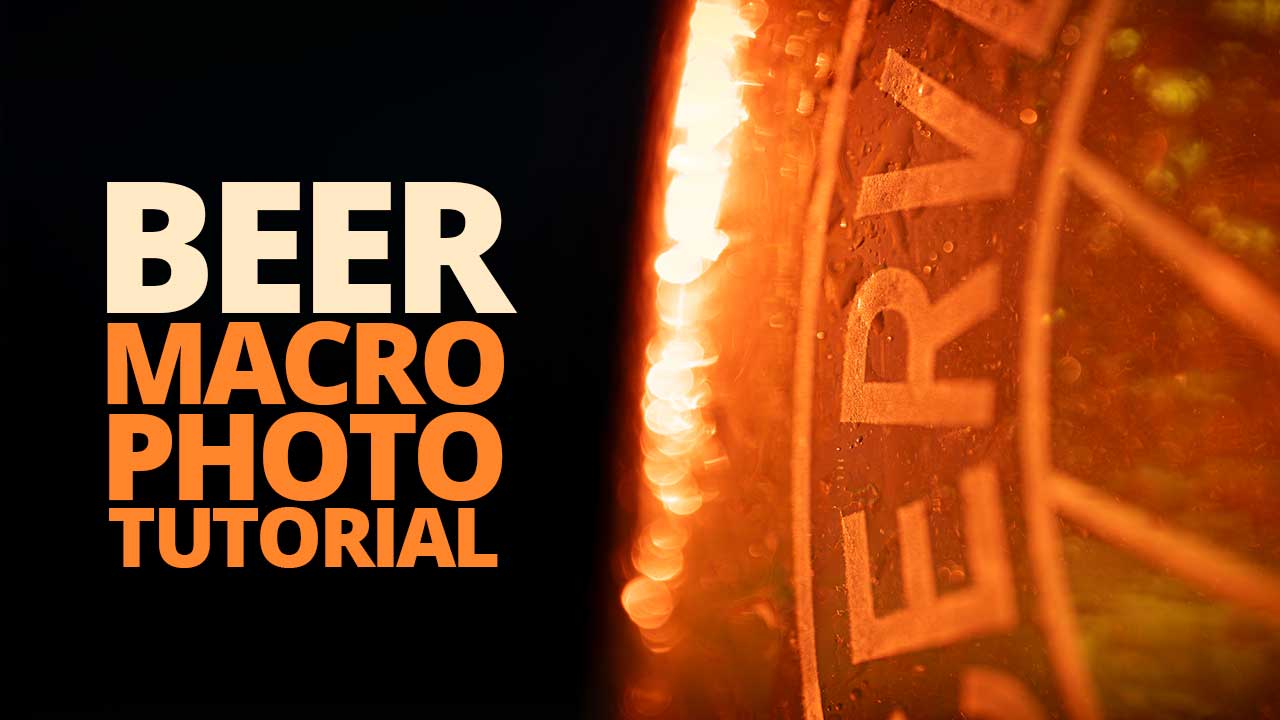
Don’t Forget the Bottle
Once you’ve played with glasses, try shooting the beer bottle itself. Brown or green glass reacts differently to light, but with the right angle, you can catch reflections, lens flares, and details like water droplets or label textures.
In our shot, we used one Amber Lighting Arm to create a glow and added a White Lighting Arm with an orange filter to bring in soft, coloured highlights. The result was a moody, atmospheric still.


This Beer Glass Macro Photography Tutorial is proof that you don’t need a studio full of gear to create compelling images. All you need is your camera, a beer, and a little help from Adaptalux lighting.
So, next time you reach for a beer, think twice – maybe shoot it before you drink it!
Remember to subscribe to our YouTube channel for regular macro photography tutorials, ideas and inspiration.

- Macro Photography with Hot Glue: Alien Egg Abstracts at Home - 29th March 2026
- Adaptalux at The Photography Show 2026 – Our Biggest and Brightest Year Yet - 23rd March 2026
- Needle Macro Photography – How to Capture the Eye of a Needle (10x magnification) - 15th March 2026


